Showing posts with label sewing. Show all posts

Tuesday, February 14, 2012

Tutorial Tuesday: Purse Organizer


After wanting a purse organizer for quite some time now I finally decided to create my own. Since I hadn't ever made one before I wasn't sure about the size of it. I will be making some modifications to the depth of the pockets but since I was using scraps I just used what I had on hand. 

Materials Needed: 
 - 1/3 yd. main fabric
 - 1/4 yard lining
 - 1/3 yd. heavyweight fusible interfacing
 - coordinating thread

Dimensions for pattern pieces:

Main fabric
 - cut 2  9x5 (front and back panels)
 - cut 2  4x5 (side panels)
 - cut 1  9x4 (bottom)
 - cut 2  9x6 (for pockets)
 - cut 2  4x6 (side pockets)

Interfacing
 - cut 2  9x5 (front and back panels)
 - cut 2  4x5 (side panels)
 - cut 1  9x4 (bottom)


Lining
 - cut 2  9x5 (front and back panels)
 - cut 2  4x5 (side panels)
 - cut 1  9x4 (bottom)


 Here are all my pattern pieces cut out and ready to go.

 Iron interfacing onto all the main fabric pieces except for the pockets. 

Fold pockets in half lengthwise and press.  


Lay the pocket pieces on top of the main fabric pieces making sure to line up the bottom edges. 

Now figure out the size of the pockets. I drew my lines every 3 inches on the front and then on the back I made the pockets 5 inches, 2 inches, 1 inch, 1 inch.  

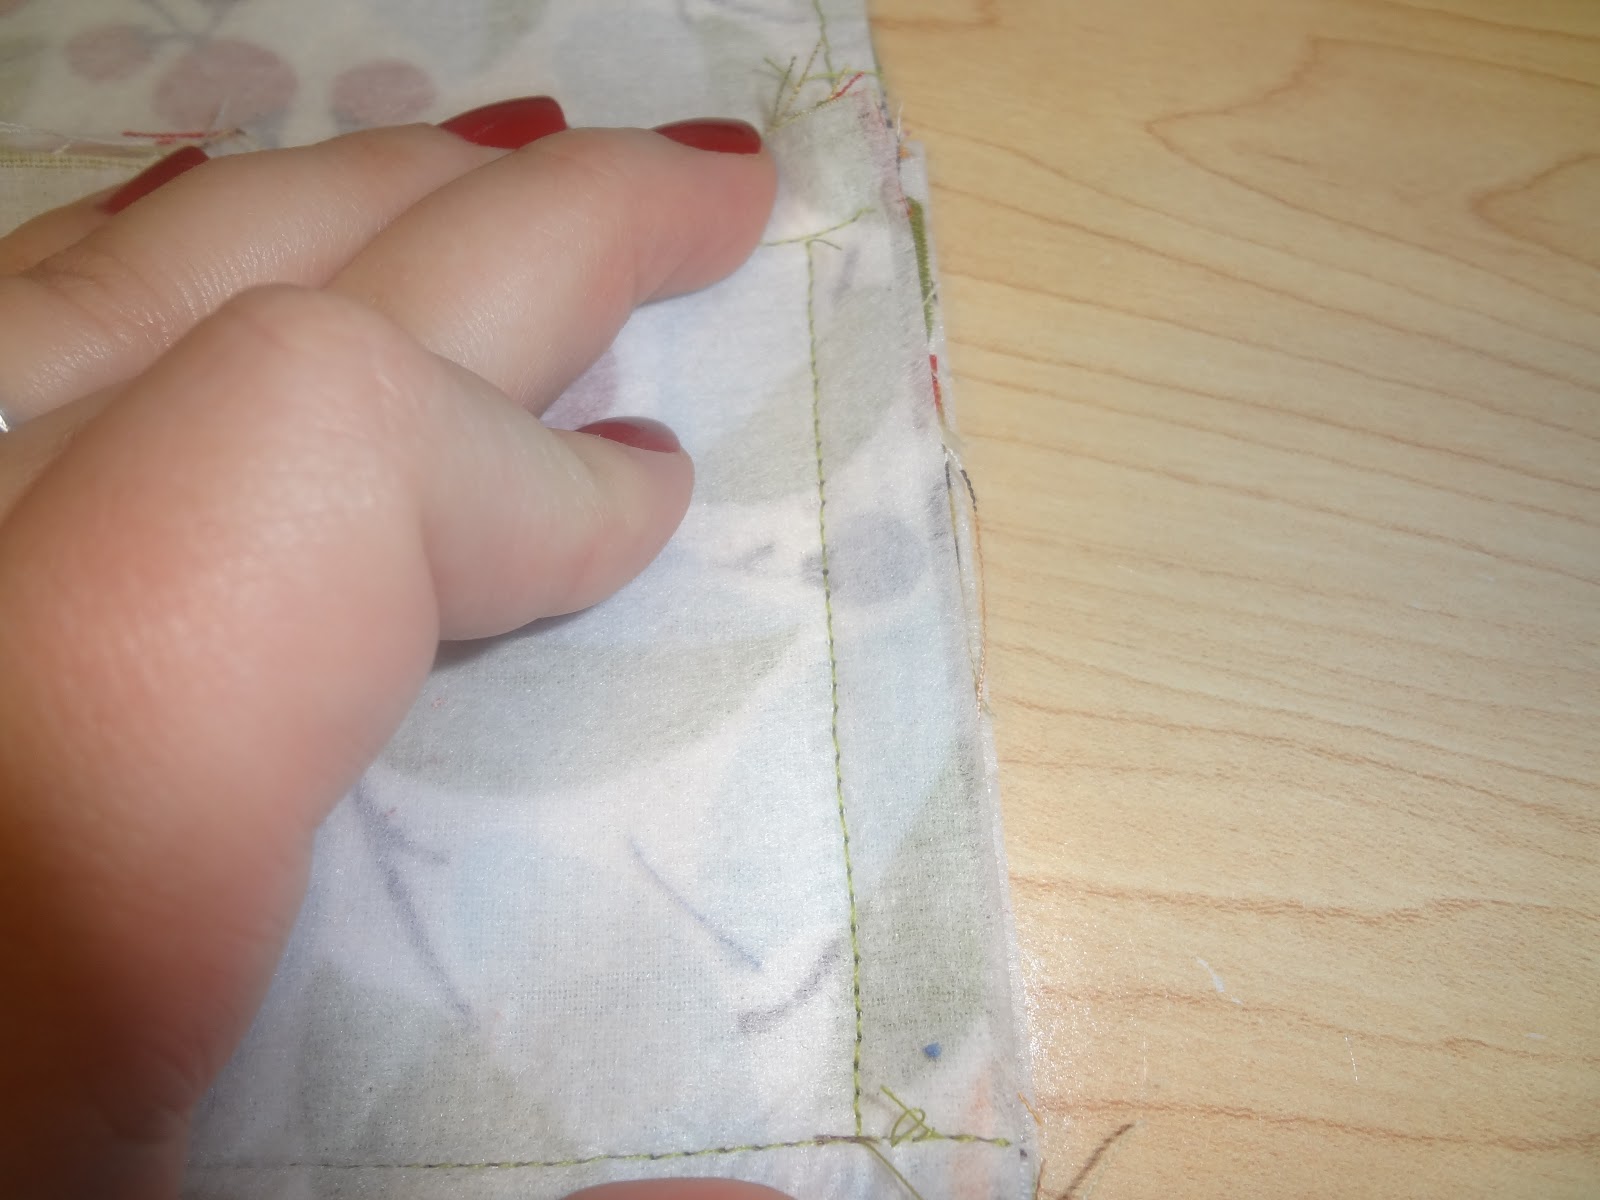
You can faintly see my lines here. These can be adjusted based on the size of the items you want to organize. 

Baste the pockets onto the main pieces to help hold them in place as you sew. I basted them with a 1/4 inch seam.
{on a side note, I am so happy that my darling hubby sent me out for a mani on Friday!  My nails are much prettier for this tutorial because of it}

 Sew down the lines you drew to create the pockets. Be sure to backstitch at the top so that the wear and tear of using the organizer doesn't fall apart. 


Pin right sides together and sew the bottom piece to the front using a 1/2 inch seam. Repeat with the other side panel. 

 Here is how the bottom piece looks once all sewn onto the front and back panels. 

Now it gets a bit tricky!  Pin the side panels to the bottom (there will be about 1/2 inch on both side that goes PAST the seams you just stitched). Sew from line to line (leaving the 1/2 inch on either side unsewn!). 

When done it should look like this. 

 Pin and sew the sides together to create the outer part of the bag. 

Clip the corners to make the bag sit better once turned.  

This is what the outer part of the bag will look like once it is all sewn together.  

Finish the lining of the bag the same as the outer part of the bag (except without the pockets). 

Fold the top edges down 1/4 inch wrong sides together and press {tutorial fail - I completely forgot to take a picture of these steps} . Then place the lining inside the bag, so that wrong sides are together and pin into place making sure the seams line up. 

Topstitch around the top to sew the pieces together and you are DONE!

Now the true test... how does it work?  Well, here is my actual purse. (see same fabric, told you I made it with scraps). This is the before, where I would have to dig for the items I needed while usually struggling to hold a wiggly 10 month old and chasing a rambunctious 2 year old. 

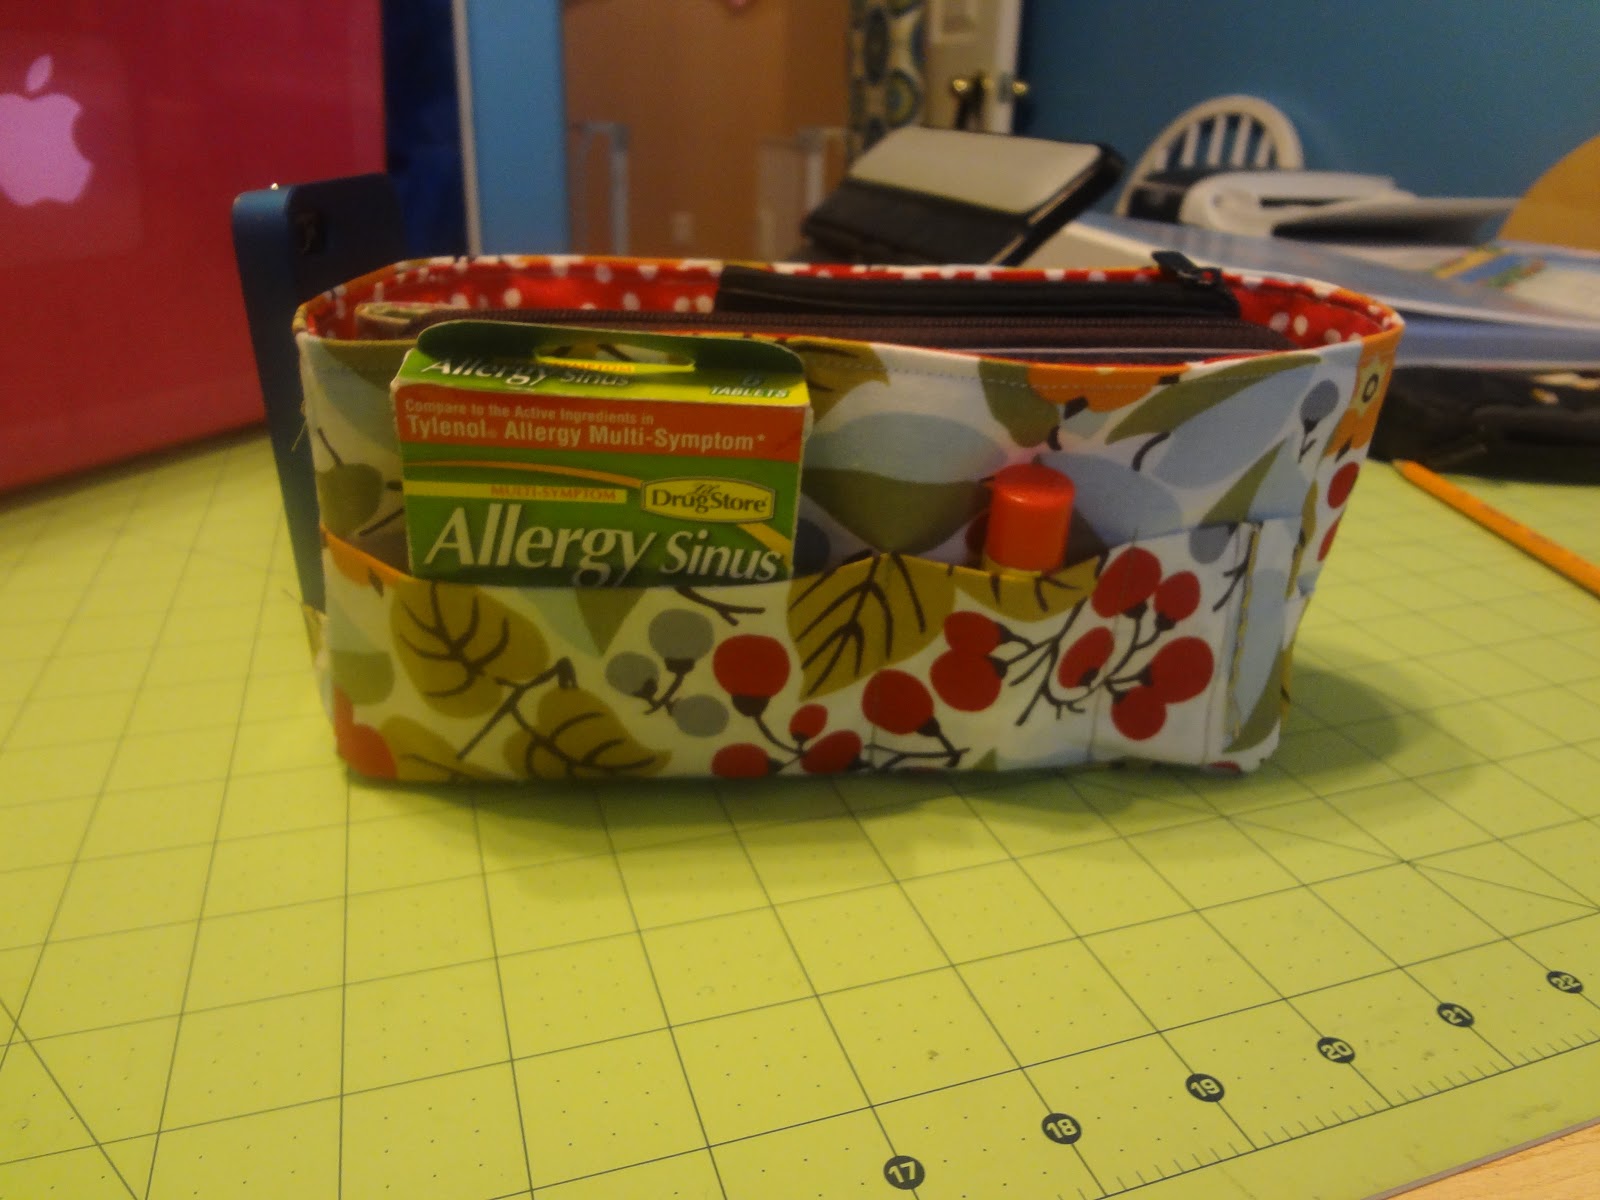
I loaded all my items into the organizer, small items in the pockets and the larger ones in the center.

view from the top
And my purse after with the organizer in. So much neater!  Added bonus... changing purses is now a breeze since you just take the organizer and put it into your second bag.

See, how much easier does it get?

I can't wait to make another one that is a bit larger (for those huge mommy bags that I will be carrying more once I no longer have TWO babies in diapers! LOL)

Please leave a comment if you use this tutorial and let me know how it turns out. This is my first tutorial so if anything is unclear or needs more explanation I would be happy to do so!

Happy Sewing!

Friday, February 3, 2012

Craft Room Valance

Once again Pinterest has inspired me!  My craft room was in need of curtains and I had recently bought this third coordinating fabric that matched the previous fabric I had purchased. With my hubby's help, I hung the fabric from the existing curtain rod so I could stare at if for a bit. The look of long curtains was amazing, however, my hanging scrapbook storage and magnetic rack (in the photo- on the right) made long curtains pretty much impossible. 

So while scrolling through my Pinterest feed I came across this post about No Sew Curtains. Being that I know how to sew, I decided to make my own version of these using them as my inspiration. I measured my curtain rod and went to work figuring out what I needed to do. My print looked better (in my opinion) one direction than the other and so I had to piece the fabric together to make the length I needed. Instead of having a seam down the center, I used my full panel in the center and then two side panels. This way the seams would be covered by the accent strips. 

After sewing those and them hemming the sides and bottom, I made a casing for the rod at the top. Once that was done, I got to work on the accent strips. For those I cut two 6" strips of fabric, sewed them right sides together, and then turned them.  After top stitching along the sides and sewing the ends into a point, I added a button and buttonhole for attaching them.  
Here is the finished product. I will probably be going back and shortening the accent strips to make the valance pull up a bit more like the inspiration picture.  I could not be more happy with how these turned out. Walking into my craft room now I am greeted with pops of design and color instead of just lots of blue!

Thursday, February 2, 2012

Pillowcase Dresses

 Here are a few recent creations for some darling little girls!  I am always thrilled when we get to go to a birthday party for a little girl. That means sewing girlie creations that I rarely get to make!  Pillowcase dresses are so quick and easy so I love giving them as gifts. Each of these took me less than an hour to complete and less than a yard of fabric. I like to dress them up a bit with coordinating fabrics and such.
 SO what do YOU think???

Wednesday, February 1, 2012

Sewing Machine Cozy

 In continuing my posts on my craft room decorating, next comes my sewing machine cozy. While happily pinning one day I came across this pin for a sewing machine cozy complete with pockets on the side. Yet another perfect project for making my craft room even more cozy.

So one night after coming home from Bible study, I went into my craft room and began sewing. First I whipped up a valance for the window (post coming soon) and then since it was only 11pm and I had had a venti coffee, the night was still young. So I decided just to cut the fabric for my machine cozy. Next think I knew, it was done. Yes, I didn't get to bed until 1:45am that next morning, but I felt so nice to get these projects accomplished.

Sunday, January 29, 2012

I wish I had a daughter...

Pinterest strikes again! When I saw these ruffle butt onesies I just had to make them for someone. Luckily, my sweet friend Chelsey was just about to have her second little girl. I knew instantly what she would be getting at her baby shower. She already mentioned wanting Big Sister and Little Sister shirts her daughters could wear at the hospital. Thanks to some iron-on vinyl and pink onesies from Walmart. But they are so boring on their own. 
 
So this is what I did to the back. This is about 5 or 6 layers of ruffles!  {SQUEAL} They turned out ADORABLE!!!  I must say, as tedious and time consuming as it was to cut the strips, overlock the edges to help with fraying, ruffle the strips, and then sew them all on, they turned out great & I can't wait to make more. Just need more little girls in my life!

Monday, January 16, 2012

Finally my addiction gets funded!

Now that Christmas is over and the new year has come, I finally have some down time. Time to sew what I want! Sew something for ME!  I have long been wanting to make some curtains for underneath my crafting desks in order to hid all the junk storage I have underneath. While that means hours in the fabric store searching for the perfect fabric, it also means LOTS of money (I measured my desk and it will take about 8 yards of fabric to make the curtains! YIKES

So while on a quick trip to the fabric store, I decided to finally listen to my husband (the businessman and entrepreneur's advice) and test the waters in making and then selling my creations to others. Since Valentine's Day is approaching I thought about what I was doing this time last year. I was sewing Valentine Chair bags for my boys with my new machine!  When I made them there were lots of Facebook Ohhs and Ahhs and I even had a few "orders" for bags. So off I went, happily sewing the bags.

Keep in mind a year ago there was no Pinterest in my world so I found the tutorial for these the "old fashioned" way - AKA - my Google reader. 

Quickly, while leaving said fabric store, I typed up a quick Facebook post to test the interest level for Valentine Chair bags. Within a couple hours I had 5 bag orders!  Not too shabby.  A couple days later I was back at the store picking out felt, Valentine fabric, and the assorted notions I would need to fulfill my orders. Fabric was cut, piled, organized and prepped for sewing. Having a bit more sewing experience than I did a year ago and NOT wanting to fight with the bag like I did previously, I made a few changes to the original design making the bottom of the bag SO much easier to sew! Thanks to Pinterest and the amazing Copy Cat Bag tutorial (which is sadly no longer online - so glad I printed the tutorial out!) I saved myself hours of frustration and thus streamlined my assembly process.

Just a little over a week later and my bags are being delivered to customers and received with great joy (YAY- for customer satisfaction). After posting finished product pics on Facebook, I received another order for 2 bags as well as a order from a friend that wanted a purse like mine (again, the Copy Cat Bag!).


Not sure where this will lead as I do have 4 small children, homeschooling to accomplish, a house to manage, and the need for some down time, but I do know that very soon I should have my under desk curtains as well as a few other nice touches to make my crafting space a bit more friendly on the eyes.

About Me

My photo
The Mills family was established on April 20th, 2002 when Bryan C. Mills married Allison Wilson. The family grew in 2005 with the birth of Christopher and then again in 2007 when Cameron first made his appearance. It just grew a little more in 2009 with Zachary's arrival and then again in 2011 when Ethan entered the world with a bang! We hope to continue to grow our family as God allows. We are truly blessed and praise God each day for the joy we bring each other!